
OVERVIEW
In continuation to the other posts about how to setup wxWidgets under various platforms , we look at using wxWidgets with Code:Blocks under Ubuntu. The advantage of Code:Blocks is that it has an existing integration with wxSmith which is a GUI builder for wxWidgets and its very easy to integrate the wxWidgets library into the IDE.
PRE-REQUISITES
Before installing Code::Blocks, it is assumed that wxWidgets is already downloaded and built. If not then you can follow the instructions in https://truelogic.org/wordpress/2021/10/31/setting-up-wxwidgets-environment-for-c-in-ubuntu-linux/
INSTALLING CODE::BLOCKS
We need to add a repository from which to download Code::Blocks:
sudo add-apt-repository universe
sudo apt update
sudo apt install codeblocks
This will complete the installation of Code::Blocks. However we also need to install some extra plugins to make development easier:
sudo apt install codeblocks-contribCODE::BLOCKS FIRST RUN
When you run CB for the first time, it will detect the installed C/C++ compilers in the system and prompt you to select which one to select as default. Most likely it will be gcc. Once the IDE has opened, you have to setup some global compiler and linker flags. For that you need a project. Go to File->New Project. Give it any name. Then in the project create a new file called test.cpp and put in some very basic wxWidgets code. Before you can build it, you have to update the config settings.
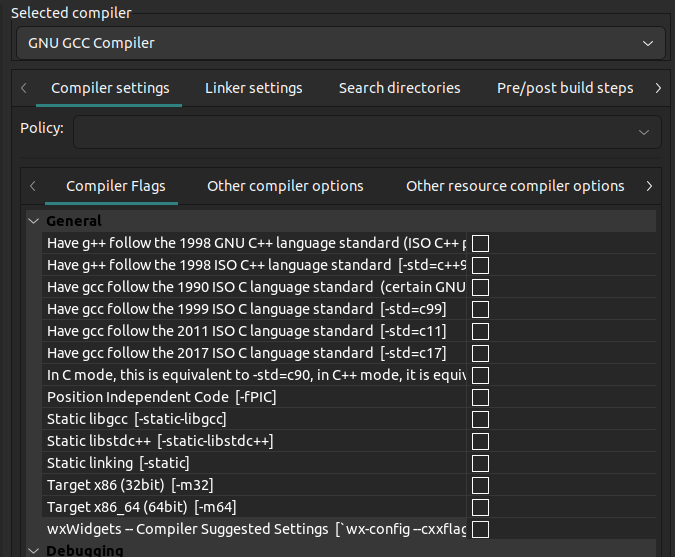
In the menubar go to Project->Build Options
Under the Compiler Flags section, right click on the list and choose New Flag. Give the name as “wxWidgets Compiler Settings”. In Compiler flags field put `wx-config --cxxflags`
Do not omit the leading and trailing backticks. Click Ok
Again under the Compiler Flags section, right click on the list and choose New Flag. Give the name as “wxWidgets Linker Settings”. In Linker flags field put `wx-config --libs` . Click Ok
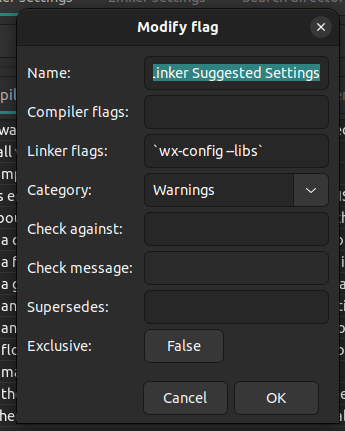
If you are planning to use webview component, then you have to add webview to the Linker Flag: `wx-config --libs webview` and in Search Directories->Linker tab, add the libs folder of wxWidgets. Without the libs folder, it will not find the library for webview.

Now we are ready to build and run wxWidgets programs.
Leave a Reply